
There is a skill that podcasters, YouTubers, course creators, coaches, and business owners around the world are desperately paying for right now and most of them cannot find someone reliable to do it.
They record an hour-long YouTube video, a two-hour podcast, a long webinar, or a live stream. They know those long recordings contain thirty seconds of absolute gold a story that stops you mid-scroll, a statistic that makes your jaw drop, a punchline that lands perfectly. They also know that thirty-second clip, turned into a vertical video with the right captions and pacing, could rack up a hundred thousand views on TikTok or Instagram Reels in 48 hours.
The problem is they do not have time to watch their own recordings back and find those moments. They do not know how to edit. They do not understand what makes something go viral on short-form platforms. And even if they knew all of that, they already have a business to run.
That gap is your income opportunity. A short-form content clipper takes long-form video podcasts, interviews, YouTube videos, webinars, coaching calls and turns them into short vertical clips of 30–90 seconds optimized for TikTok, Instagram Reels, YouTube Shorts, and LinkedIn. This service is in genuine, high, growing demand and it can be offered from anywhere in the world, including Ghana, Nigeria, Kenya, or anywhere else in Africa, to clients in the US, UK, Canada, and Australia, with payment received directly.
This guide covers everything: what the service is, what skills you need, what tools to use, how to do the actual editing work step by step, how to package and price your offer, how to find and pitch clients, how to receive international payment, and how to grow it into a real income.
Let’s get into it.
Table of Contents
- What Short-Form Content Clipping Actually Is
- Why the Demand for This Service Is Exploding in 2026
- What Skills You Actually Need (It Is Less Than You Think)
- The Tools You Need to Start — Free and Paid Options
- How to Actually Clip and Edit: Step-by-Step Tutorial
- What Makes a Clip Go Viral: The 7 Rules of Short-Form Video
- How to Package Your Service: Offers, Deliverables, and Timelines
- How to Price Your Clipping Service
- How to Find Your First Clients Without a Portfolio
- How to Pitch Clients: Scripts and Templates That Work
- How to Receive International Payment From Africa
- How to Deliver Your Work Professionally
- How to Scale From a Side Income to a Full Business
- Common Mistakes New Clippers Make (And How to Avoid Them)
- Frequently Asked Questions
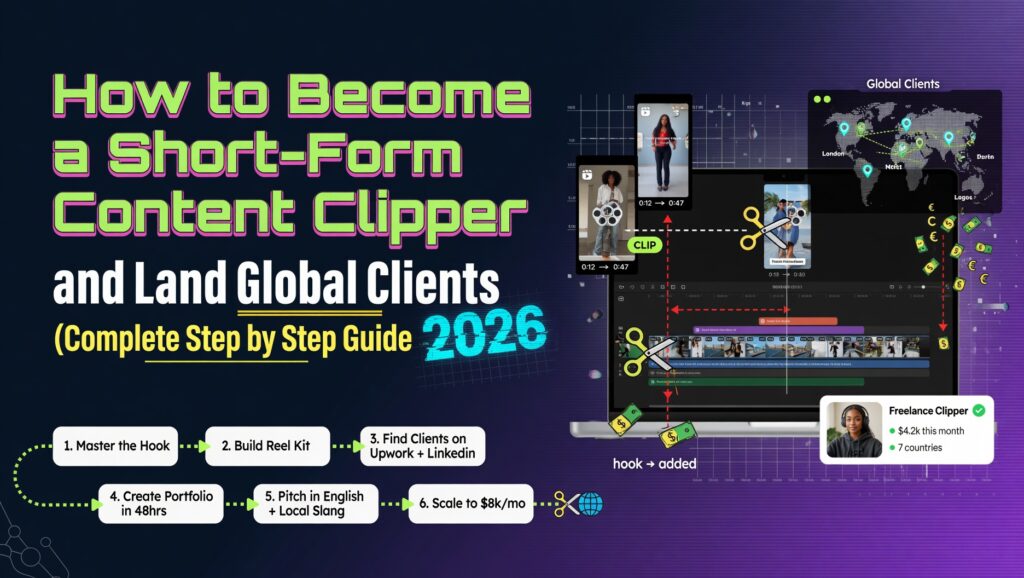
What Short-Form Content Clipping Actually Is
Short-form content clipping is the process of taking long-form video content anything from 10 minutes to 3 hours and identifying, cutting, editing, and formatting the best 30–90 second segments into standalone vertical videos ready to publish on platforms like TikTok, Instagram Reels, YouTube Shorts, and LinkedIn Video.
It sounds simple. The actual skill and the reason people pay well for it is in three things that are genuinely hard:
1. Identifying the right moments. Not every funny, interesting, or informative segment makes a good short-form clip. The ones that work share specific characteristics — they hook immediately, they build quickly, they land cleanly. Developing the eye for which thirty seconds of a two-hour podcast is going to stop someone mid-scroll is a skill that takes practice.
2. Editing for the attention economy. Short-form audiences are not watching because they have nothing else to do. They are being pulled in the middle of a scroll. The editing needs to create a sense of momentum, remove every pause and filler word, use captions that keep the eye engaged, and sometimes add b-roll, graphics, or sound design that makes the clip feel native to the platform.
3. Formatting correctly for each platform. TikTok, Reels, and YouTube Shorts all have specific aspect ratios, caption styles, safe zones, and technical requirements. A clip formatted incorrectly looks amateur even if the content is excellent.
What You Are Delivering to Clients
A typical short-form clipping package delivers:
- 5–15 edited vertical video clips per long-form video
- Captions burned into the video (not just subtitles — styled, animated captions)
- Each clip cropped and exported to 9:16 aspect ratio, 1080×1920 pixels
- Recommended hooks and captions for the client to use when posting
- Organised delivery via Google Drive or a shared folder
Some clippers also offer a posting service scheduling and publishing directly to the client’s accounts. That is an upsell, not a baseline expectation.
Why the Demand for This Service Is Exploding in 2026
The numbers explain the demand better than any argument:
Short-form video is the fastest-growing content category across every major platform. YouTube Shorts gets 70 billion views per day. TikTok has over 1.5 billion monthly active users. Instagram Reels drives more engagement per post than any other content type on the platform. LinkedIn added native video and short-form clips are outperforming text posts dramatically.
Every business that creates any long-form content is a potential client. Podcasters , there are over 4 million active podcasts globally. YouTubers with channels above 10,000 subscribers. Online coaches, consultants, course creators. Real estate agents, financial advisors, personal trainers — anyone who does video content. Every single one of them is sitting on hours of footage they are not using.
The platforms themselves are pushing creators to post short-form content daily. YouTube’s algorithm rewards channels that post Shorts in addition to long videos. Instagram’s reach drops for accounts that stop posting Reels. TikTok’s algorithm gives new accounts organic reach that would cost hundreds of dollars in paid advertising to replicate. Every creator knows they should be posting short-form content every day. Almost none of them have the time or skills to do it.
AI tools have made the service faster but not eliminated the human. Automated clipping tools exist — OpusClip, Descript, and others can identify potential clips algorithmically. But they cannot match the judgment of a skilled human who understands what actually makes content shareable. Clients who have tried automated tools and been disappointed are now actively looking for humans who can do it better.
The price point is accessible for clients but meaningful for creators. A YouTuber or podcaster with a modest audience earning $5,000–$20,000 per month from their content can easily justify paying $300–$800 per month for a clipping service that saves them 10–15 hours and potentially multiplies their reach. For you, that is real income. For them, it is an obvious business expense.
What Skills You Actually Need (It Is Less Than You Think)
Here is the honest list:
Required:
- Basic video editing ability – you do not need to be a professional editor, but you need to be comfortable cutting clips, adjusting audio, and exporting video files
- A feel for social media – you need to understand what makes people stop scrolling, which means you should be an active consumer of TikTok, Reels, and YouTube Shorts yourself
- Reliable internet connection – you will be downloading large video files from clients and uploading finished clips
- Attention to detail – captions with typos, clips that cut off mid-sentence, and exports with wrong aspect ratios kill your reputation fast
- Communication skills – you are working with international clients remotely, so clear written English is essential
Not required:
- A film or media degree
- Expensive equipment – you do not appear on camera at all
- A professional recording studio
- Prior paid work in video editing
Nice to have (but learnable on the job):
- Knowledge of caption styling and typography
- Understanding of audio mixing and noise reduction
- Familiarity with platform-specific trends and formats
The barrier to entry is genuinely lower than most people assume. The skills that matter most identifying great moments, editing with pace, formatting correctly are learnable in 2–4 weeks of focused practice.
The Tools You Need to Start – Free and Paid Options
Video Editing Software
CapCut (Free — Recommended for Beginners)
CapCut is the single best free tool for short-form content clipping. It was built specifically for short-form video, has a desktop version (not just mobile), includes auto-captioning that is surprisingly accurate, has built-in templates for TikTok and Reels formatting, and handles 9:16 vertical video natively. For a beginner, CapCut handles 90% of what you need to deliver professional clips.
Download: capcut.com (desktop version — far more capable than the phone app)
DaVinci Resolve (Free — Best Quality, Higher Learning Curve)
DaVinci Resolve is professional-grade video editing software used in Hollywood film production. The free version has no watermark and no time limits. If you have any ambition to offer higher-end editing services or work with larger content creators, learning Resolve is worth the investment of time. It is harder to learn than CapCut but significantly more powerful.
Download: blackmagicdesign.com/products/davinciresolve
Adobe Premiere Pro (Paid — $22/month, Industry Standard)
If you eventually want to work with professional production teams, agencies, or large media clients, Premiere Pro is the industry standard. The monthly cost is worth it once you are earning consistently from clipping. Start free with CapCut or Resolve, upgrade when income justifies it.
Auto-Captioning Tools
Captions are non-negotiable. Studies consistently show that 85% of social media video is watched with the sound off. Clips without captions lose the majority of their potential audience. Good captions — styled, accurate, well-timed are one of the primary things that make a clip look professional.
CapCut Auto-Captions (Free)
Built directly into CapCut. Reasonably accurate. Allows you to style the font, colour, and size. Handles most English accents well. For a beginner, this is where to start.
Captions.ai (Free tier available)
A dedicated captioning app with excellent accuracy and a wide range of caption styles including the animated, highlighted-word format that performs well on TikTok. More polished output than CapCut’s basic captions.
Descript (Paid — $12/month)
Descript transcribes your video into a text document and lets you edit the video by editing the text — delete a sentence from the transcript and the corresponding video is cut. It also has excellent captions and a feature called Overdub that can clean up audio issues. Very useful once you are handling volume work.
File Management and Delivery
Google Drive (Free)
15GB free, expandable cheaply. Create a folder for each client. Receive long-form files from clients, upload finished clips for client download. Simple, professional, universally accessible.
WeTransfer (Free)
For sending large files that would exceed email limits. The free tier allows files up to 2GB. Very easy for clients who are not technical.
Communication
Notion or Google Docs (Free)
Use this to send clip notes, revision requests, and project updates. Keep everything written and documented.
Loom (Free tier available)
Record a short screen-share video to walk clients through their delivered clips and explain your choices. A 2-minute Loom video reviewing a client’s clips instead of a text email is one of the simplest ways to seem significantly more professional than competing clippers.
Optional but Useful
OpusClip or Vizard (Paid AI tools)
These AI tools scan long videos and automatically identify and cut potential clips. They are not good enough to replace human judgment, but they can be used to pre-screen a 2-hour video and surface candidates then you review and refine. They save time on long content once you are handling volume.
How to Actually Clip and Edit: Step by Step Tutorial
This is the practical how-to. Follow this process for every piece of client content.
Step 1: Watch the Long-Form Content With Intention (30–60 Minutes for a 1-Hour Video)
Do not skip this step by jumping straight into the editor. Watch the content first — but not passively. Watch with a notepad open and timestamp the moments that stand out.
What you are looking for:
- Strong openers — A line that would make someone stop scrolling immediately. Often these are bold statements, surprising statistics, provocative questions, or the beginning of a story with a clear hook
- Complete thought units — A segment that has a beginning, a middle, and an end within 60–90 seconds. A story, an analogy, a how-to, a point with an example
- Emotional moments — Laughter, frustration, genuine excitement, vulnerability. Emotion drives shares
- Quotable lines — A single sentence that captures a complete idea. These become single-quote clips or text-over-video posts
Write down timestamps: “2:14 — great stat about X,” “17:42 — story about client failure — very relatable,” “31:08 — punchy 3-step framework, starts and ends clean.”
Step 2: Pull the Clips Into Your Editor
Open CapCut Desktop. Import the full-length video. Use your timestamp notes to scrub to each moment and make rough cuts grab a bit more than you think you need on each side. You can tighten in the next step.
For each rough clip, create a separate project or track. Keep your source file intact.
Step 3: Tighten Each Clip – The Art of Short-Form Pacing
This is the step that separates a mediocre clipper from an excellent one.
Cut filler ruthlessly. Every “um,” “uh,” “you know,” “like,” long pause, and repeated phrase should be cut. This is called jump cutting. When done well, jump cuts create energy and pace. When done poorly, they feel choppy. The key is to cut on audio – the cut should land on a clean consonant or at the beginning of a word, not in the middle.
Start as late as possible. The beginning of every clip needs a hook in the first 2–3 seconds. Watch where the real content starts. Cut everything before that. Viewers make the decision to keep watching in the first 2–3 seconds. Do not waste that time on intro or context.
End clean. End the clip at the natural conclusion of the thought. Clips that trail off or end mid-sentence feel unfinished and perform poorly. If the speaker pauses or says “so anyway” — that is your endpoint.
Target length: 30–60 seconds for TikTok and Reels. Up to 90 seconds for YouTube Shorts. Under 30 seconds for LinkedIn. The shortest clip that contains the complete thought is almost always better than a longer clip that includes surrounding context.
Step 4: Format to 9:16 Vertical
This is the technical step beginners often get wrong.
In CapCut Desktop: create a new project set to 1080×1920 (9:16 vertical ratio). Import your tightened clip. The default horizontal video will be letterboxed you will see black bars top and bottom.
Reframe the video. Scale up the clip so the speaker fills the frame vertically. The speaker’s face should be in the top 60% of the frame the bottom 40% is where captions will live. If the speaker moves around, use keyframes to track their position.
For talking-head interviews and podcasts recorded in a wide shot: zoom in to focus on the speaker. Most modern cameras record at high enough resolution that you can crop significantly without quality loss.
Safe zones: Keep the speaker’s face and any important visual elements between 10% from the top and 30% from the bottom. TikTok and Reels both overlay buttons, usernames, and captions in the bottom area — your clip needs to leave space for those elements even after your own captions.
Step 5: Add and Style Captions
In CapCut: go to Text → Auto Captions → Generate. Wait for the transcription. Review every word carefully — auto-captions are accurate but not perfect, especially for proper nouns, technical terms, or non-American accents.
Style your captions for platform performance:
- Font: Bold, high contrast, easy to read at small sizes. Avoid anything decorative or script
- Size: Large enough to read without zooming, small enough not to dominate the frame
- Position: Lower third — below the speaker’s mouth, above the bottom 15% of the frame
- Colour: White text with a dark outline, or a solid background box behind the text
- Highlighting: The best-performing caption style in 2026 highlights the word currently being spoken in a different colour — yellow or orange on white is popular. CapCut has this as a built-in style option
One word per beat style vs full sentences: One or two words at a time, timed to the speech rhythm, keeps the eye active and creates pace. Full sentences displayed at once feel slow. Aim for 2–4 words per caption frame.
Step 6: Audio Cleanup
Bad audio kills clips even if the content is excellent. Basic fixes:
Remove background noise: Cap Cut has a built-in noise reduction filter. Apply it to the clip’s audio track. Reduce by 30–60% overcorrection makes voices sound robotic.
Volume normalisation: The speaker’s voice should be consistent throughout. CapCut’s audio normalisation feature handles this automatically. Apply it.
If the original audio is genuinely poor (loud echo, bad microphone, competing background sounds): you can still deliver the clip but should note in your delivery that the source audio has limitations. Do not deliver a clip with audio so bad it reflects poorly on your work.
Step 7: Add a Hook Graphic or Text (Optional but High Impact)
The first 2–3 seconds of a clip are make-or-break. One of the most effective ways to increase watch time is to add a text graphic over the first frame that teases the payoff.
Examples:
- “I lost $10,000 doing this wrong “
- “The #1 mistake coaches make on discovery calls”
- “This changed everything for my business”
This text appears for 2–3 seconds at the start, then disappears as the speaker begins talking. It functions like a headline – it tells the viewer why they should keep watching. Add it as a text layer in CapCut positioned in the center of the frame, large and bold.
Step 8: Export at Correct Settings
In CapCut: Export → Resolution 1080p → Frame Rate match the source (usually 24 or 30fps) → Format MP4 → Quality High.
File naming convention: ClientName_ClipNumber_Topic.mp4
Example: JohnSmith_Clip01_WhyMostBizFail.mp4
Clean file names are a small detail that signals professionalism. Clients notice.
Step 9: Write Clip Notes for the Client
For each clip, write a short note covering:
- Recommended caption for posting (the text the client posts with the video)
- Best platform for this specific clip (TikTok? LinkedIn? Both?)
- Best time to post (based on platform data for their audience)
- Any context the client should know (“This clip ends on a cliffhanger – good for driving traffic to the full episode”)
Deliver these notes in a simple Google Doc alongside the clips. This extra layer of insight is what separates a $300/month clipper from a $700/month clipper.
What Makes a Clip Go Viral: The 7 Rules of Short-Form Video
Knowing how to edit is technical. Knowing which moments to clip and how to structure them is the real skill. Here are the seven rules that drive short-form video performance.
Rule 1: The Hook Has to Work in 2 Seconds
The first moment of your clip – before a single word of context , has to give the viewer a reason to keep watching. The best hooks create an open loop: they promise a payoff the viewer has not received yet.
“The reason most people fail at this…” — the viewer wants to know the reason. “I made $47,000 in one month and almost quit anyway , here is why…” ,the viewer wants to know why. “Stop doing this if you want to grow on Instagram…” , the viewer wants to know what to stop doing.
Clips that open with context (“In today’s podcast, we talked about…”) or slow build-up fail because the viewer has already scrolled away.
Rule 2: The Content Must Be Complete Without the Full Video
A clip that requires the viewer to watch the full episode to understand it does not work as a standalone piece of content. Each clip must be a complete unit – a story with a beginning, middle, and end, or a point made fully with an example, or a how-to that gives you the full steps.
Clips that end with “…and I talk about the rest of this in the full video” are not clips , they are trailers. Trailers perform poorly on TikTok and Reels.
Rule 3: Emotion Over Information
Of two clips one that contains a fascinating statistic and one that contains 60 seconds of genuine emotional storytelling, the emotional story will outperform the statistic almost every time. Short-form platforms are social environments, not educational ones. Content that makes people feel something gets shared.
This does not mean every clip has to be raw or emotional. It means the clips that move people ,make them laugh, make them angry, make them feel seen, make them surprised ,outperform the clips that merely inform.
Rule 4: Pacing Is Everything
Short-form audiences have been conditioned by the best content on the internet. They know what good pacing feels like even if they cannot explain it. A clip with too many pauses, too much filler, or a slow build drains energy and loses viewers. A clip that moves that cuts tight, that has forward momentum in every second keeps people watching.
Your job in the edit is to remove every moment that does not add to the forward momentum of the clip.
Rule 5: Native Format, Not Repurposed
A clip that looks like it was taken from a YouTube video and just cropped vertically performs worse than a clip that feels like it was made for TikTok or Reels. The difference is in the details: captions styled like popular TikTok creators use, sound mixing that sounds good on phone speakers, a frame that fills the vertical screen properly rather than showing a talking head in a tiny horizontal box.
When you format clips, ask: does this look like it belongs on this platform? If the answer is no, something needs to change.
Rule 6: The Last 5 Seconds Matter as Much as the First 5
TikTok and Reels algorithms reward completion rate – the percentage of viewers who watch your full clip. A clip that loses viewers in the last 5 seconds kills its algorithmic performance. End every clip at the natural conclusion of the thought. Cut before the awkward trailing off. End on a strong line, a punchline, or a clear moment of resolution.
Rule 7: Captions Are Not Optional
Watch your own short-form consumption for five minutes. Notice how many videos you watch partially or fully with the sound off. Now imagine delivering clips to clients without captions. You would be removing the majority of their potential audience before the clip even starts.
Accurate, well-styled captions are a baseline expectation, not an upgrade. Deliver every clip with captions burned in.
How to Package Your Service: Offers, Deliverables, and Timelines
Offering a clear, packaged service is far more effective than offering “video editing.” Clients do not want to figure out what to ask you for they want to choose between clear options.
Here are three package structures that work well for short-form clipping:
Starter Package – “Clip Pack”
Best for: New clients, podcasters, and YouTubers testing the service
What you deliver:
- 1 long-form video processed per month (up to 60 minutes)
- 5 finished vertical clips (30–90 seconds each)
- Captions on every clip
- Recommended posting captions in a Google Doc
- Delivery within 5 business days of receiving the video
Price: $150–$200 per month
Why this works: Low commitment for the client. Low time investment for you as you build speed. Clear, bounded deliverable with no scope creep.
Growth Package – “Full Month”
Best for: Active content creators posting 2–4 long-form pieces per month
What you deliver:
- Up to 4 long-form videos processed per month (each up to 90 minutes)
- 5–8 clips per video (20–32 clips total per month)
- Captions on all clips
- Recommended posting captions and best platform recommendations
- Delivery within 3 business days per video
- One round of revisions per clip
Price: $400–$600 per month
Why this works: This is where you make real income. Four videos per month at 2–3 hours of editing time each is 8–12 hours of work — meaning you can manage 3–4 Growth clients simultaneously while working full-time.
Premium Package – “Done For You”
Best for: Established creators, podcasters with large audiences, and businesses with marketing budgets
What you deliver:
- Unlimited long-form videos per month
- 8–12 clips per video
- Captions on all clips
- Posting captions, hashtag suggestions, and best-time-to-post guidance
- Direct posting to client’s social accounts (they give you access)
- Priority delivery within 2 business days
- Weekly summary report of clips delivered and performance data
Price: $800–$1,500 per month
Why this works: At this price point, the client is buying time and peace of mind. They post nothing, they worry about nothing, they just review what you send and approve it.
Add-Ons to Offer After Building a Relationship
- Thumbnail design for YouTube Shorts: +$50/month
- Platform-specific resizing (square for Instagram feed, horizontal for Twitter): +$75/month
- Monthly performance report with clip analytics: +$50/month
- Rush delivery (within 24 hours): +$50 per video
How to Price Your Clipping Service
Pricing is where most new service providers undervalue themselves. Here is a realistic framework.
Understand Your Time Cost First
Before setting a price, calculate your realistic time per deliverable:
- Watching a 60-minute video and timestamping moments: 60–75 minutes
- Cutting, tightening, and formatting 5 clips: 2–3 hours
- Adding and reviewing captions on 5 clips: 45 minutes
- Writing delivery notes: 30 minutes
- Uploading and organising delivery: 15 minutes
Total for a Starter Package: Approximately 5–6 hours for your first few clients. Down to 3–4 hours as you build speed and workflow.
At $150 for a Starter Package, you are earning $25–$50 per hour , reasonable to start, not the ceiling. At $400 for a Growth Package with 4 videos at 4 hours each, you are earning $25 per hour. At $600 for the same, you are at $37.50 per hour.
As your speed increases, your effective hourly rate climbs. Experienced clippers process a 60-minute video into 5 clips in under 2 hours , which makes the economics dramatically better.
Do Not Compete on Price With Everyone
The short-form clipping market has two segments: buyers looking for the cheapest possible option (race to the bottom, never leads to good clients), and buyers who want reliable quality and clear communication (they pay more, stay longer, and refer others).
Position yourself in the second segment. Your pitch should never be “I am the cheapest.” Your pitch should be: “I deliver consistently, I am reliable, my clips look professional, and working with me is easy.” Those qualities command $300–$800 per month without apology.
The African Advantage in Pricing
Here is something important for creators based in Ghana, Nigeria, Kenya, or elsewhere in Africa: your cost of living is lower than your clients’ cost of living. A $400/month retainer from a US client represents very different purchasing power than it does for them. You do not need to charge US-market rates to earn meaningful income.
At the same time, do not massively underprice- underpricing signals low quality in the service industry, and it makes clients wonder what they are getting that costs so little. Price based on value delivered, not geography. A well-packaged $400/month service is accessible to most content creators with modest audiences while providing excellent value to you.
How to Find Your First Clients Without a Portfolio
Not having a portfolio yet is not a real obstacle it just requires a different approach.
Step 1: Create 3–5 Spec Clips as Your Demo Reel
Choose two or three public creators you admire podcasters, YouTubers, coaches and clip their content without being hired. Pick a 60-minute video, find the five best moments, edit them into professional vertical clips with captions, and organize them as a demo package.
This serves two purposes: it proves you can do the work, and if done well you can actually send it to the creator as a pitch.
Do not ask for permission before creating spec clips. Create them. Then pitch the creator by showing them clips you made from their own content.
Step 2: Pitch Creators You Have Already Made Clips For
After creating spec clips from a creator’s content, reach out with something like: “I made five clips from your last podcast episode. No obligation I just wanted to show you what I can do. Here is the link.”
Attach the Google Drive link to your finished clips. Let the quality speak.
This approach works far better than cold pitches describing your services in the abstract. The creator sees exactly what working with you would look like. If the clips are good, you have a client. If they are not ready to hire, you have a sample for your portfolio.
Step 3: Go Where Creators Are Looking for Help
Fiverr — Create a gig specifically for short-form clipping. Be specific in your title: “I will clip your podcast into viral TikTok and Reels-ready shorts.” Include examples. Price your starter gig competitively ($75–$150 for a single video) to build reviews. Once you have five reviews, raise prices to your full rates.
Upwork — Create a profile specifically around short-form video clipping. Apply to relevant jobs daily. Your first 3–5 jobs should be lower-priced to build a rating. After that, your rating does the selling for you.
Facebook Groups — Search for groups like “Podcast Editors Network,” “Content Creator Community,” “Online Business Owners,” and similar. Do not spam. Participate genuinely. When someone asks about finding help with video editing or short-form content, respond helpfully and mention your service naturally.
Twitter/X and LinkedIn — Follow podcasters and YouTubers in your niche. Engage meaningfully with their content. When they post about struggling to keep up with social media or not having enough clips, you have an opening.
Directly via email — Identify 20 podcasts or YouTube channels you could genuinely help. Find the host’s contact email (usually on their website or in the podcast show notes). Send a personalised pitch with spec clips.
Step 4: Your Network Is Already Your Referral Source
Tell everyone you know that you offer short-form video clipping. Not as a desperate pitch — just as a clear statement of what you do. One referral from a satisfied client is worth more than twenty cold pitches.
How to Pitch Clients: Scripts and Templates That Work
The pitch that works is specific, brief, and shows not tells.
The Cold Email That Opens With the Work
Subject: I clipped your podcast here are 5 TikTok-ready shorts
“Hi [Name],
I have been listening to your podcast for a while. I clipped your most recent episode on [topic] into five short-form videos ready to post on TikTok and Reels.
No strings attached here is the Google Drive link: [link]
I offer a monthly short-form clipping service for podcasters and creators who want to grow on short-form platforms without spending hours editing. If you have liked what I made, I would love to work together.
[Your name]”
That is it. No lengthy bio. No credentials list. No list of features. Just proof of the work and a clear offer.
The Fiverr Gig Description That Converts
Title: I Will Clip Your Podcast or YouTube Video Into Viral TikTok and Reels-Ready Shorts
Description opening:
“You record the content. I turn it into short-form clips that grow your following on TikTok, Instagram Reels, and YouTube Shorts.
You send me your long-form video. I watch it, find the best moments, cut them into tight 30–90 second vertical clips, add styled captions, and deliver a complete package ready to post — usually within 3 business days.
What you get: → 5 vertical clips per video (1080×1920, 9:16 ratio) → Styled captions on every clip → Recommended posting captions for each clip → Organised Google Drive delivery → One round of revisions
Send me a message with your video link to get started.”
Following Up Without Being Annoying
If you send a pitch and do not hear back after 5–7 days, one follow-up is appropriate. Something like:
“Hi [Name], just checking in on the clips I sent last week. Happy to make adjustments or answer any questions. Let me know either way I appreciate your time.”
After that, move on. Do not send a third email. Your time is better spent finding the next potential client.
How to Receive International Payment From Africa
This is one of the most common questions from African freelancers and the answer is more accessible than most people think.
Option 1: Payoneer (Recommended for Africa)
Payoneer is widely available across Africa including Ghana, Nigeria, Kenya, and most other countries. It gives you a receiving account with a US bank routing number and account number which means clients can pay you by bank transfer as if you were a US freelancer. You can also request payments directly through Payoneer’s payment request feature.
Payoneer integrates directly with Upwork, Fiverr, and several other platforms. You can withdraw to your local bank account in GHS, NGN, KES, or your local currency.
Sign up free at payoneer.com.
Option 2: Fiverr and Upwork (If Working Through Platforms)
If you find clients through Fiverr or Upwork, payment is handled through the platform. You withdraw to Payoneer, and from Payoneer to your local bank. The platforms handle the currency conversion and the client relationship around payment, which reduces friction considerably.
Option 3: Wise (for Direct Client Relationships)
Wise gives you local receiving account details in multiple currencies including USD, GBP, EUR, and AUD. Clients send you money as a local transfer, Wise converts it at the real mid-market rate, and you receive it in your Wise account and withdraw to your local bank. Low fees, fast transfers. Available in Ghana, Nigeria, Kenya, and most African countries.
Option 4: Direct Bank Transfer for Large Clients
For clients paying $500+ per month, international wire transfer directly to your local bank is often the simplest option. Your bank will have a SWIFT code. Share your SWIFT code, bank name, account number, and branch address with the client. Transfers typically take 3–5 business days and banks charge a receiving fee , factor this in.
Invoicing Clients
Send a proper invoice for every payment. Include:
- Your name and country
- Invoice number and date
- Description of services (e.g. “Short-form video clipping — May 2026 retainer”)
- Amount due in USD (or the agreed currency)
- Payment due date
- Your Payoneer or Wise payment details
Create invoices free at Invoice Ninja or Wave Apps.
How to Deliver Your Work Professionally
Professional delivery is what turns a one-time client into a long-term retainer client. The quality of your clips matters, but the experience of working with you matters just as much.
Organise Your Delivery Folder
For every client, create a Google Drive folder with this structure:
[Client Name] - Short Form Clips/
  ├── Month - May 2026/
  │   ├── Video 1 - [Episode Title]/
  │   │   ├── Clip_01_Topic.mp4
  │   │   ├── Clip_02_Topic.mp4
  │   │   ├── Clip_03_Topic.mp4
  │   │   ├── Clip_04_Topic.mp4
  │   │   ├── Clip_05_Topic.mp4
  │   │   └── Posting Notes - Video 1.pdf
  │   └── Video 2 - [Episode Title]/
  └── Master Posting Calendar.pdf
Clean folder structure tells the client you are organised. Disorganised delivery random file names, everything in one folder tells them you are not.
Send a Loom Video With Every Delivery
Record a 2–3 minute Loom video (loom.com – free) walking the client through their clips. Open each clip, play 10 seconds of it, explain why you chose that moment and what you recommend for posting. Close with any notes about the source video’s audio or any other relevant observations.
This takes 5–10 minutes. It feels like getting a personal review rather than just a file dump. Clients who receive Loom delivery videos almost never leave.
Communicate Proactively
If you receive a video from a client and notice an issue – bad audio, a very long video that will take longer than usual, a topic that might need extra care ,message them before delivering, not after.
If delivery is going to be delayed for any reason, tell the client one day before the deadline. Not after missing it.
Clear, proactive communication is rarer in freelancing than it should be. It is also one of the main reasons clients pay a premium and stay long-term.
How to Scale From a Side Income to a Full Business
Once you have 2–3 retainer clients and feel comfortable with the workflow, here is how to grow.
Raise Your Prices With Existing Clients
Give clients 30 days’ notice before raising rates. A brief, professional message: “I am raising my monthly rate from $350 to $450 starting next month. I wanted to give you advance notice and thank you for being a great client to work with.”
Good clients who value your work will stay. Clients who leave over a $100 price increase were not building a long-term relationship anyway.
Add Capacity With a Subcontractor
Once you have more client demand than you can handle alone, consider bringing in a second editor someone you train on your process and quality standards. You continue handling client communication, clip selection, and quality review. They handle the technical editing.
This is how a one-person freelancing practice becomes an agency. You are no longer selling your time you are selling a system.
Specialise in a Niche
Becoming “the person who clips podcasts about personal finance” or “the clipper that works with fitness coaches” is more valuable than being a general clipper. Niche specialisation allows you to charge more (because you understand the audience), market more efficiently (because you know exactly who to target), and build a reputation faster.
Build a Lead Generation Asset
Consider starting a YouTube channel or TikTok account where you share before and after clips (with client permission), give short tips on what makes short-form video work, and document your clipping business. This creates inbound enquiries potential clients finding you rather than you always reaching out to them.
The best marketing for a video service is video.
Common Mistakes New Clippers Make (And How to Avoid Them)
Mistake 1: Starting Too Slow on the Actual Work
The most common mistake is spending weeks preparing, reading guides, and researching tools instead of doing the work. You will learn more from editing five real clips than from reading twenty tutorials. Start editing on day one. Start pitching on week two.
Mistake 2: Delivering Without Watching the Final Output on a Phone
Your clips will be watched on phones. Before delivering any clip, watch it on your phone with the sound off. Then watch it with the sound on. If anything feels off captions too small, audio too quiet, pacing too slow fix it before it reaches the client.
Mistake 3: Underdelivering on Captions
New clippers often treat captions as an afterthought. They are not. A clip with poor captions — typos, bad timing, wrong style, no captions at all is not a finished clip. Budget time for caption review in every job.
Mistake 4: Accepting Scope Creep Without Addressing It
A client who pays for 5 clips and then says “actually can you just do 7?” is engaging in scope creep. Address it kindly and professionally: “Happy to do 7 the additional 2 clips would be an extra $X, or I can include them in next month’s package if you want to upgrade.” Be generous in spirit, firm on boundaries.
Mistake 5: Pricing Per Clip Instead of Per Month
Per-clip pricing creates unpredictability for you and the client. Monthly retainers create stability the client knows what they are paying, you know what you are earning, and the relationship feels like a partnership rather than a transaction. Push all clients toward monthly retainers as early as possible.
Mistake 6: Not Asking for Testimonials
After your first month with a client, if they are happy with the work, ask directly: “Would you be willing to write a short testimonial about your experience working with me? It really helps me grow.” A three-sentence testimonial from a satisfied client closes more new business than any pitch you will ever write.
Frequently Asked Questions
Do I need a powerful computer to do this?
You need a computer that can handle video editing without crashing. A mid-range laptop with at least 8GB of RAM and a modern processor handles CapCut and most editing tasks adequately. DaVinci Resolve and Premiere Pro require more power. If your computer struggles, work with compressed proxy files during editing and export from the original at the end.
Can I do this on a phone only?
The mobile version of CapCut can handle basic clipping for simple videos. But the desktop version is significantly more capable and efficient. For a professional service, a computer is strongly recommended.
How long does it take to edit one video?
Expect 4–6 hours for a 60-minute video producing 5 clips when you are starting out. With practice and a refined workflow, that drops to 2–3 hours. Speed comes from knowing what to look for before you open the editor.
What type of content is easiest to clip?
Talking-head podcasts and interviews with clear audio are the easiest to start with. Documentary-style content, heavily produced videos, or anything with complex multi-camera edits is more difficult. Start with simple talking-head content.
Do I need to understand the topics I clip?
You do not need to be an expert, but general understanding helps you identify the strongest moments. A clip from a finance podcast where the host explains compound interest clearly might make an excellent clip but you need to recognize that it was explained clearly, not just that it was mentioned. Curiosity and general knowledge help. Deep expertise is not required.
What happens if a client is unhappy with my clips?
Handle it professionally. Ask specifically what they would change. Apply the feedback in the revision. If the revision still does not satisfy them, offer one final round and then move on. One revision round is standard in all packages note this clearly in your agreements upfront.
Can I use AI tools to speed up my work?
Yes , but carefully. Tools like Opus Clip or Descript can help identify candidate clips or speed up captioning. Use them as assistants, not replacements. Your judgment about what makes a moment worth clipping is the thing clients are paying for. AI cannot replace that judgment not yet.
Is this market oversaturated?
The demand for short-form content creation is growing faster than the supply of reliable, quality clippers. There is no shortage of clients. There is, however, a shortage of clippers who deliver consistently high-quality work, communicate professionally, and show up reliably. Those qualities are what the market is genuinely short of and they are entirely within your control.
Summary: What to Do in the Next 7 Days
If you have read this far, you have more knowledge about short-form content clipping than most people who are currently charging for the service. The gap between you and your first client is not information — it is action.
Here is your next seven days:
Day 1: Download CapCut Desktop. Watch one tutorial on vertical video formatting and one on adding auto-captions. Then immediately practice on a public YouTube video.
Day 2–3: Choose two creators whose content you already consume. Download one long-form video from each. Identify five strong moments in each. Cut your first spec clips.
Day 4: Format your spec clips to 9:16, add captions, export, and organise them in a Google Drive folder as if you were delivering to a real client.
Day 5: Write your Fiverr gig or set up your Upwork profile specifically around short-form clipping.
Day 6: Write personalised cold email pitches for three creators using the template in this guide. Attach your spec clips from their content.
Day 7: Send those emails. Post in one relevant Facebook group. Tell two people in your network what you are now offering.
You will not get everything right immediately. Your first clips will not be perfect. Your first pitch responses may be slow. That is normal and expected. The clippers earning $2,000–$5,000 per month from this service were also beginners with imperfect first clips a few months ago.
Start. Deliver. Improve. Repeat.
Every strategy in this article is based on research, testing, and conversations with creators and service providers actively working in this space.
Related Articles on TheDiaHub.com:
- How to Build a Knowledge-Based Side Hustle in Africa Using Notion and Gumroad (Complete 2026 Guide)
- How to Build a Knowledge-Based Side Hustle in Africa Using Notion and Gumroad (Complete 2026 Guide)
- How to Rank in Google and Show Up in AI Search (Complete Guide for African Creators)
- AI Tools Recurring Commission 2026: 8 Best Programs Paying Monthly

Latif Saeed Okwan is a digital entrepreneur from Accra, Ghana helping Africans build real online income through affiliate marketing, AI tools, and digital business. Every method on TheDiaHub.com has been personally researched with the African reality in mind — no hype.